Giant Tower Stack by Relatable, The Jumbo Block Game Where You Balance Building Blocks - Ultimate Outdoor Games, Yard Games for Adults, & Family Games Challenge - Ages 8+
$69.99 (as of February 1, 2026 16:30 GMT +00:00 - More infoProduct prices and availability are accurate as of the date/time indicated and are subject to change. Any price and availability information displayed on [relevant Amazon Site(s), as applicable] at the time of purchase will apply to the purchase of this product.)Timetome Reusable Water Painting Books for Kids – 3-Pack Magic Water Reveal Coloring Books with Water Pens (Fairy Tale, Animal & Dinosaur) No-Mess Coloring & Reusable Fun Travel Activity for Ages 3–6
$33.99 (as of February 1, 2026 16:30 GMT +00:00 - More infoProduct prices and availability are accurate as of the date/time indicated and are subject to change. Any price and availability information displayed on [relevant Amazon Site(s), as applicable] at the time of purchase will apply to the purchase of this product.)Building a well-designed dragon park starts with smart habitat placement. Even though DragonVale World was discontinued in 2020, the same layout strategies help maximize earnings and fun in the original DragonVale and similar games. Think of your park like a city or theme-park blueprint: planning ahead can save you time and DragonCash. A neat park means you know exactly where each elemental habitat is, so you can feed dragons and collect income efficiently. Without a good plan, you might miss collecting from a full habitat or accidentally block space for future habitats.
When habitats are placed thoughtfully, your dragons will generate more treasure without delays. Each habitat can only hold so many dragons and store a limited amount of DragonCash (or Gems). If a habitat fills up and you forget to collect, that income stops growing. Good placement means you easily spot and tap every habitat when needed. Also, grouping by element helps: a dragon with multiple elements fits in any of its element habitats. By clustering Fire dragons together (for example), you only tap one area to harvest all Fire rewards.
Efficient layout also makes expanding easier. As you unlock new islands, plan them with a purpose: maybe one island for high-earning epic dragons, another for breeding and social habitats. This keeps the park organized. Plus, having everything in logical zones (Fire/Cold on one island, Jungle/Earth on another, etc.) creates balanced production. In the original DragonVale, special decorations even add tiny boosts: placing Zodiac statues next to matching dragons can increase income slightly. All these factors mean that a little planning goes a long way.
Park Layout Tips
Use these practical tips to shape your park:
- Cluster by element/theme: Keep Fire and Cold together, Jungle and Earth together, etc. This saves space and makes management quick. For example, a Fire-and-Air island (hot and light) can share fire-themed decorations, while an Earth/Jungle island gets more natural scenery.
- Designate islands: Use each island for a clear purpose: one could house high-level Legendary dragons, another for breeding with Treat Habitats. This way, you know exactly where to go for each task.
- Leave expansion slots: Always reserve a couple of empty spaces on each island. Giant habitats or new expansions will need room (they can be 6×6!). If you fill every spot, you’ll later have to sell something important to clear space.
- Use decorations smartly: In DragonVale World, decorations give experience. In DragonVale, some decorations (like Star Generators or Zodiac statues) give small boosts to certain dragons. Even if bonuses are minor, use a few themed decorations to mark zones (e.g. snowflakes on a Frozen island). This helps you remember island themes at a glance.
- Set paths for clarity: Sidewalks or trails (if available) can visually separate regions and guide you through your park. A path around an island’s edge lets you walk the perimeter, making it easy to exit a crowded area and see all habitats.
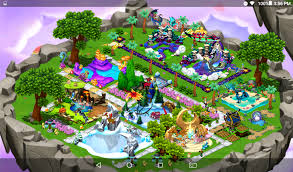
A sample isometric park map (conceptual) showing grouped habitats by element and clear pathways. Notice how this example clusters similar habitats together. Organizing the park like this not only looks good but makes collecting DragonCash as simple as tapping each cluster. Also note the empty borders – keeping open water or paths around blocks of habitats preserves space for future builds.
Even though this picture is a fantasy layout, it illustrates key ideas. On each island, you can put giant or large habitats in a row or block, with smaller ones filling gaps. Grouping like this reduces wandering: you tap one dragon, then the next in the same area. It also streamlines planning: you’ll always have one or two empty spots left on an island to spend on a new habitat later.
Habitat Tiers and Upgrades
Habitats come in three sizes: Regular, Large, and Giant. Each size holds more dragons and usually raises the maximum DragonCash stored. Upgrading is expensive but worthwhile: a Level 1 Earth Habitat (Regular) holds 2 dragons, but a Level 6 Giant Earth holds 5 and can accumulate up to 125,000 DragonCash. That’s one of the highest single yields in the game. (Similarly, a max Air Habitat holds 5 dragons and hits 100,000 DragonCash) Prioritize upgrades on habitats with the highest-earning dragons like Earth, Fairy, and Air.
Not every upgrade adds slots—some only boost the cash cap. For example, Treat Habitats (used for event-only dragons) cap at 3 dragons and cannot become Giant. Once a habitat is maxed, focus resources elsewhere. Check park level requirements too: in DVW, most habitats unlock their Large upgrade around level 25, and become Giant around level 40. Plan which upgrade to do first: often the jump from Large to Giant (using Gems) is the biggest gain.
Upgrade Advice: Save Gems for critical Giants. A Giant Earth or Fairy Habitat often out-earns adding a small habitat elsewhere. Also, consider adding a new Large habitat if you have space, rather than overspending on one element. Our [Habitat Upgrade Guide] has full costs and timing if you need specifics. In any case, before spending precious Gems, think: does going from 4 to 5 dragons give enough extra income? Often the answer is yes for high-level habitats.
Using Bubbles and Decorations
DragonVale World gives a handy bubble reminder: a DragonCash icon appears on a habitat when it’s nearly full (at 10% remaining). This bubble is your cue to collect the treasure before it overflows. Always watch for these bubbles—tap them as soon as you see them. This avoids lost earnings and gets the habitat back to work.
Decorations in DVW mainly earn experience points, but they make your park look alive. In the original DragonVale, certain decorations give small bonuses: for example, placing a Star Generator on an island can boost income of zodiac-aligned dragons. Even if you skip bonuses, use a few decorations to enhance your theme and break up empty space.
Another tip: some decorations (like fountains or rides) can group dragons visually. If you place a decoration with a large visual footprint (like a wizard tower) near a cluster, it helps delineate areas. And on seasonal islands (in DragonVale), built-in decorations define where special dragons belong.
Bottom line: Use bubbles as reminders to collect, and use decorations to add flair and subtle boosts. These details aren’t game-changing, but they polish your design and can slightly speed up how you manage the park.
Special Habitats: Social and Rift
A few habitats have unique roles that affect layout:
- Social Habitats (DragonVale): These habitats produce Pure or Mythic drops instead of DragonCash. In original DragonVale, habitats like the Flower or Ocean habitats on Social Islands give Pure Essence when you collect. Dedicate one island for social habitats, since their income is tracked separately. Keep them together so you can cash in batches of Pure Essence easily.
- Treat Habitats: In both games, these are used only for certain breeding dragons. Note: Treat Habitats never upgrade past Large – they top out at 3 dragons. Once an event ends, put all Treat Habitats on one island and free up others. Don’t spread them out.
- Epic/Seasonal Habitats: DVW had things like Dragonsai and Zodia. These usually have fixed small capacities. You can cluster such epics on one island since they don’t need much feeding. In original DV, Epic habitats like the Sunken or Ancient habitats produce huge one-time DragonCash (250,000 at full) – upgrade those first on a special island if you have them.
- Rift Habitats (DragonVale): These are on a separate Rift dimension island. Dragons sent here earn Etherium instead of DragonCash. Treat each Rift island like its own park layout: maybe dedicate one habitat to each major Rift dragon type. Upgrade Rift habitats gradually with Etherium.
- Legendary Habitats (DragonVale): These take many slots (e.g. Kairos’ Megatat is 8×8) and produce crowns. If you have one, prepare an entire island with nothing else but that habitat (and maybe an empty VIP habitat).
For all these special cases, the strategy is similar: dedicate specific islands to them so their unique drops don’t mix with your main DragonCash production. If you need more ideas on which habitats to focus on, check out our [DragonCash Earnings Guide] or [Habitat Upgrade Guide].
Sample Park Layouts
How might these tips look in practice? Imagine you have two major islands. On Island 1, you keep your highest-earning dragons: Earth, Fairy, and Air. You place two Giant Earth Habitats (with 5 dragons each) and surround them with Giant and Large Fairy/Air habitats. All Earth dragons go into those Earth habitats, all Air dragons into Air habitats, etc. On Island 2, you cluster Fire and Cold habitats together (perhaps making a “volcano” theme). You also add Jungle/Earth habitats on a third island with lots of greenery decor.
A conceptual map of a dragon park layout. Each island is clustered by habitat type with open paths for expansion. This illustrated layout highlights those ideas. Notice island boundaries: each has empty space around it for future buildings. Notice also how similar habitats sit side by side. In a real game, you’d use your park’s grid the same way.
Another example: Suppose you have extra Air and Water dragons. You could make Island 3 all about breeding and income: two Treat Habitats for hatching, plus one large Farm, and mix in a Sunken and Ancient habitat for high-tier dragons. Meanwhile, Island 4 might be your “endgame island” with the Dragonarium, a Moon Shrine, and your final Giant habitats of various types. The key is that each island is purposive.
Sketching helps. You might grab graph paper or a drawing app and plot where each habitat will go. Tip: Use different colors or sticky notes for each element when sketching. Some players overlay sticky notes on a printed park grid to rearrange easily.
Remember, these examples are guides, not rules. You have a limited grid to work with, so adapt freely. If one island runs out of spots, expand or trim decorations. If you unlock a powerful new dragon, consider reorganizing so it fits an optimal habitat. The constant question is: “Will this dragon benefit from being here?” If yes, go for it. If not, maybe use that space for a boosting decoration or leave it for future dragons.
FAQs
Q: How do I move a habitat?
A: Tap the habitat and select “Move” (or drag-and-drop in some versions). Then drag it to an empty spot on the same island. You may need to clear obstacles or paths first. You cannot move a habitat between islands directly, so place it carefully.
Q: How can I fit more dragons into a habitat?
A: Only by upgrading it. A Regular habitat holds its base number; upgrading to Large (or Giant) adds slots. For example, a Regular Earth has 2 slots, Large Earth 4, Giant 5. Treat Habitats max at 3 slots and won’t increase further. No other tricks can increase slot count.
Q: Should I spread dragons across islands or keep them grouped?
A: Generally, group similar dragons together for ease of collection. However, don’t leave an island completely unused, as that DragonCash is idle. It’s fine to mix elements if needed, but most players make one island for major earners, another for mid-level, etc. Use empty islands as they unlock, and relocate dragons as you upgrade habitats.
Q: How do I know which habitats are full?
A: Besides the bubble reminder, you’ll see a progress bar or icon on each habitat. If you see coins or gems icon on it, it’s ready to collect. In DragonVale World on desktop, the bubble icon above a habitat signals it’s 90% full – collect it then.
Q: What if I run out of habitat space?
A: If you’re at the island limit, prioritize selling or consolidating. Sell the lowest-earning habitat (often one you can rebuild later) and replace it with a higher-level one. In DragonVale, you can also spend Gems to unlock additional habitat slots. Plan ahead so you don’t hit the cap too soon; expand islands gradually.
Conclusion and Next Steps
Good habitat placement is all about planning and tweaking. A well-laid-out park means more DragonCash, less hassle, and a park you’re proud of. To help execute your plan, set up a comfortable workspace: for example, a large dragon-print gaming mouse pad makes moving your cursor smooth for long strategy sessions (disclosure: affiliate link). Keep your notes and sketch supplies organized with a desk organizer, and consider using a blueprint pad or sketching tablet (affiliate link) to draw out your ideas before rearranging in-game.
Once you’ve perfected your layout, share it! Post screenshots of your islands on Pinterest or Instagram with #DragonValeLayout. You might inspire others or pick up new ideas. Also dive into our other guides – the DragonCash Earnings Guide and Habitat Upgrade Guide – for deeper strategies on boosting your park’s productivity.
Finally, remember that every park evolves. As you unlock new dragons and content, revisit your layout. Maybe turn an old Fire Island into a breeding farm, or convert an underused island into a decoration showcase. The best layout is the one that grows with you. Happy dragon breeding and park-building!
A clear plan and organized workspace make building the perfect dragon park enjoyable and efficient!
